At some point, every turtle owner will want to add some substrate to its turtle tank. And when that time comes a new question will come up, what is the best substrate for a turtle tank? When I wanted to add substrate to my turtle tank, I asked myself the same question, and to find out the answer I decided to do some research. Here is what I found out.
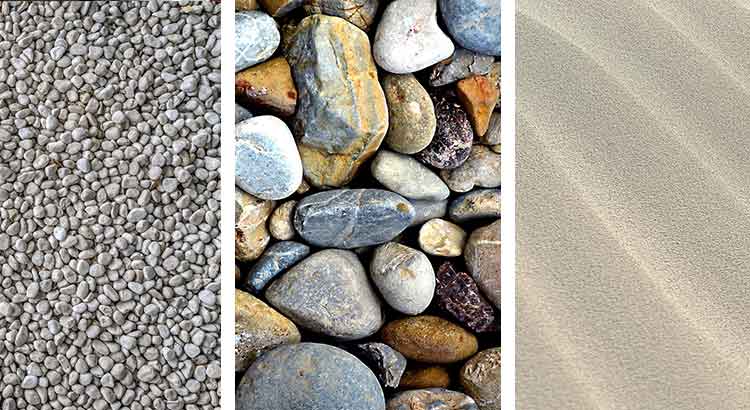
Sand, river rocks and gravel, are the most popular and best turtle tank substrates. Each one of them has its own advantages and disadvantages, so it mostly comes down to personal preference.
But you have to be very careful when you choose because some types of substrates can actually be very dangerous for your turtle. So, in the rest of the article, we are going to take a closer look at each type of substrate and see which of them can be dangerous, and what other disadvantages and advantages each one has.
Gravel

Gravel is one of the most popular choices, but unfortunately, it’s one of the worst choices.
Advantages of Gravel
There are quite a few serious problems with gravel, but there are a few good things so let’s start with those.
The big advantage of gravel is that it’s extremely easy to clean. The gravel is so small that no significant amount of food or algae will get under it. And it’s heavy enough so it won’t be completely sucked by the siphon.
Another advantage is that gravel can look amazing in a tank. Gravel can come in a multitude of colors, it can be white, black, blue, red, etc. and it can even be fluorescent.
But unfortunately, this is where the good things about gravel end.
Disadvantages of Gravel
The problem with gravel is that turtles can easily mistake it for food and swallow it. If this happens the intestinal tract can get blocked, or it can lead to internal bleeding. Both of these cases can result in grave health problems and even death.
The chance of this happening is not small, when turtles eat they lunge toward their food, and don’t pay attention to what else they might swallow.
Another problem with gravel is that a lot of sellers add calcium to it. Calcium is very good for turtles, but too much can lead to pyramiding, which is also something that you want to avoid.
Recommended Gravel
Gravel can still be a good option if you choose one that is large enough and has no extra calcium added. Gravel has enough weight so it won’t move around too much while your turtle swims. It’s really easy to clean, it has a nice aspect, and it can come in a variety of colors.
There are very few products that I can honestly recommend to you in this case, so I will suggest to you a single type of gravel that I’ve personally used and I had no problem with. The gravel itself is big enough that your turtle won’t eat, and there is no extra calcium added. The only thing that I would have to add is that isn’t in the product description is that you will have to wash the gravel yourself at least a couple of times before adding it to the tank.
The gravel that I recommend to you is the Silver Pearl Aquarium Gravel.
River Rocks

River rocks are an overall good choice to decorate your tank with. They have quite a few advantages, and only one disadvantage.
Advantages of River Rocks
River rocks offer a couple of advantages that make them quite popular among turtle owners.
The first one is that they are heavy enough not to be moved around by your turtle. So if you want to make a certain arrangement in the tank and you don’t want your turtle to ruin it, river rocks are the way to go.
The second advantage is that they are extremely easy to remove, unlike the other two options. And this will really come in handy when you clean the tank.
Another advantage is that they are completely safe. Even the smallest river rock should be too big for a turtle to be able to eat it. If you think that a river rock might be just too small then you can simply remove it. But most of the time there is no need for that.
As the name implies river rocks come from actual rivers. While those rocks are in the river they get moved all over the place by the running water, and as a result, they become very round and lose all of their edges. So they are perfect for decorating tanks since there is no risk that your turtle will cut itself, or get injured in any way.
Disadvantages of River Rocks
The only disadvantage that I have observed is that river rocks leave a lot of empty space between them. So a lot of dirt will get between them and this will make the water get dirty faster, and the aspect of the tank won’t be too pleasant.
But in a way, they compensate for this since they are so easy to clean.
Recommended River Rocks
To be honest with you, if you have a river nearby, you might as well just go there and pick up some rocks that you like.
As I said river rocks are nothing else but rocks found in or near a river. The only reasons why you should order them online are that you don’t have a river near you, or you want all of them to be a certain color. In case you find yourself in one of those situations I will leave you a few links with some great choices.
White River Rocks, Grey River Rocks, Black River Rocks, Normal River Rocks.
Sand

Out of all three substrates, I personally think that sand is the best one. But unfortunately, a lot of people have a lot of misconceptions about sand as a substrate. So let’s clear some of them out.
Advantages of Sand
Sand has quite a few advantages over the rest of the substrates.
The first one is that it completely covers the bottom of the tank, so not even the smallest particle of dirt won’t be able to get to the bottom of the tank. This will make cleaning the tank considerably easier.
A lot of people worry that their turtles might end up eating the sand, this is a valid concern. But nothing bad will happen. There is a chance that your turtle will eat a couple of grains of sand every once in a while, by mistake. But there is no reason to worry. Sand is very small, and won’t block the intestines, and no infection can take place due to sand being eaten. So there is no safety problem.
Another cool thing about sand is that it can come in a huge variety of colors, actually sand can have any color imaginable. To obtain those colors sand is chemically treated, but that doesn’t make the sand dangerous to the turtle in any way, so don’t worry about that if you are interested in colored sand.
Disadvantages of Sand
The biggest disadvantage of sand is that you have to be really careful when you clean it. Sand is pretty small and light, so you have to be careful how far away you hold the siphon, if you take it too close to the sand, some of the sand will get sucked away.
Fortunately, this problem can be overcome quite easily. When you clean the tank, you just have to keep the siphon as far away as possible in the beginning, and then get closer little by little, when you see that sand is starting to get sucked, move the siphon back a little, and use that distance from now on when you clean the tank.
Recommended Sand
Unlike river rocks, you can’t simply use any kind of sand that you find outside. For a turtle tank, you will want to use sand that has bigger grains. Soft sand will only cause a mess in the tank because it’s very light it will get thrown away everywhere when the turtle swims.
Here are a few links to some really cool sand:
Black Sand, White Sand, Colored Sand.
I personally think that sand is one of the best options when it comes to substrates. But there is another possibility that is even better. And that is to combine sand with river rock.
Combining River Rock With Sand
By combining river rock with sand you will be able to completely get rid of the disadvantages of river rock. And you will be able to give your tank a very interesting look.
River rocks can also come in a few different colors besides the normal grey and light brown. They can also be completely white or completely black. And since white and black go well with every other color, you can imagine how many possibilities you will have if you combine them with the colored sand.
And since the sand will fill the space between the rocks, there will be nothing that will get stuck under the rocks. And the river rocks will also help a little by making it a little harder for the sand to get sucked by the siphon when you clean the tank.
This combination only brings advantages, there is no disadvantage that you get if you combine both.
How I Use River Rocks and Sand
At the moment I have two turtle tanks, and one in one of them I use Imagitarium Black Aquarium Sand, which is simple black sand that helps the development of healthy bacterias in the water, and because it’s black it makes all the mess on the bottom of the tank hard to see. And I also placed some white rocks over it.
For my other tank, where I keep my two female turtles I went with something more colorful so I used some orange sand in combination with some white rocks. The tank looks really great but the problem is that you can clearly see when too much dirt gathers on top of the substrate, and it doesn’t look that great then. So even if the orange sand looks great, unless you want to have to clean your tank too often I would suggest you go with a different color, maybe green or something like that.
If you are interested in the products I just mentioned here are some links to Amazon from where you can get them:
- Imagitarium Black Aquarium Sand
- Imagitarium White Aquarium Sand
- Colored Sand
- White Rocks
- Grey Rocks
- Black Rocks
- Normal River Rocks
Final Thoughts
The last thing that I want to tell you is to make sure that you wash everything that you plan to add to your tank, this includes sand, rocks, and gravel. If you don’t wash them properly you might add some harmful bacteria to the tank, and your turtle might get sick.
Have fun decorating your tank!
Hello,
If you enjoy the content that we create, please consider saying a "Thank You!" by leaving a tip.
Every little bit can help us tremendously in continuing to create quality content that helps turtle and tortoise owners around the world.
We really appreciate the kindness and support that you show us!
Can I put my 2 Yo map turtles outside in the spring/summer. I have a covered patio.
Yes, you can put your map turtles outside in the spring and summer, provided you take the necessary precautions to ensure their safety and well-being. Here are some guidelines for outdoor enclosure setup and care:
Outdoor Enclosure: Create a secure and escape-proof outdoor enclosure on your covered patio. Ensure that the enclosure has a secure lid or barrier to prevent your turtles from escaping or being exposed to potential predators.
Sunlight and Shade: Your map turtles will benefit from natural sunlight. Place the enclosure in a location where they can get both sunlight and shade. Turtles need access to both basking areas for warmth and shaded areas to cool down.
Temperature: Monitor the outdoor temperature to ensure it’s within the safe range for your turtles. Map turtles typically need warm basking spots with temperatures around 85-90°F (29-32°C) and cooler areas for swimming and resting. Provide heat lamps or basking platforms as needed.
Water: Ensure your turtles have access to clean and dechlorinated water for swimming and drinking. In an outdoor enclosure, use a small pond or tub large enough for them to swim comfortably.
Diet: Continue to offer a well-balanced diet that includes both commercial turtle pellets and a variety of aquatic plants, insects, and small fish. Consider adding floating aquatic plants to the outdoor enclosure for foraging.
Supervision: Always supervise your turtles when they are outdoors to ensure their safety and well-being. Turtles can be susceptible to predators, so it’s important to watch over them.
Seasonal Changes: Be prepared for weather changes and seasonal transitions. In cooler weather or during the fall, you may need to bring your turtles back indoors or provide heating to maintain appropriate temperatures.
Hydration: Make sure your turtles have access to clean, fresh water for soaking and hydration.
Remember that proper care and supervision are essential when keeping turtles outdoors. Monitor their behavior and well-being and adjust their outdoor time as necessary. By providing the right environment and ensuring their safety, your map turtles can enjoy some time outdoors during the warm seasons.